A reflexology foot chart looks, at first glance, like someone drew a detailed diagram of the human body and then somehow folded it into the shape of a foot. Which is more or less what it is. The foot reflexology chart maps every organ, gland, and body system to a specific point or zone on the foot, and a trained reflexologist uses it to navigate the session the way a doctor uses a body diagram: a guide to what is where and what needs attention.
Most people who see a reflexology chart for the first time have two reactions: curiosity about how the zones were worked out, and doubt about whether pressing a spot on the heel could really affect the lower back. Both are reasonable. If you are not yet sure what reflexology actually is before getting into the chart, that is the right place to start. This is how the chart works, what each area of the foot maps to, and how a reflexologist actually uses it in a session.
How the Reflexology Foot Map Is Organised
The reflexology foot map is not random. It follows a consistent internal logic based on zone therapy, which divides the body into ten vertical zones running from head to toe , and the basis of the reflexology pressure points chart that most practitioners use today. Each zone passes through everything in its path, which is why a point on the foot can be mapped to an organ in the torso, since they sit in the same vertical zone.
Left Foot vs Right Foot
The left foot maps to the left side of the body and the right foot maps to the right side. Together, the two feet form the complete reflexology zones chart of the whole body. This means the heart, which sits on the left side of the body, appears on the left foot chart but not the right. The liver, which sits on the right side, appears on the right foot chart. Organs that run down the centre of the body, like the spine, the stomach, and the bladder, appear on both feet.
This mirroring is the part that tends to make people pause when they first look at the chart properly. The body’s layout is actually reflected in the foot’s layout, just compressed into a much smaller space.
Top to Bottom: Head at the Toes, Pelvis at the Heel
The body maps from top to bottom across the foot in the same order it runs in real life. The head and brain are at the toes. The neck is at the base of the toes. The chest and lung zone sits across the ball of the foot. The digestive organs occupy the arch. The pelvis and lower back sit at the heel.
Once you know this, a reflexology chart becomes considerably easier to read. The toes are the top of the body. The heel is the bottom. Everything in between follows the same order it would if you were looking at a diagram of a person standing upright.
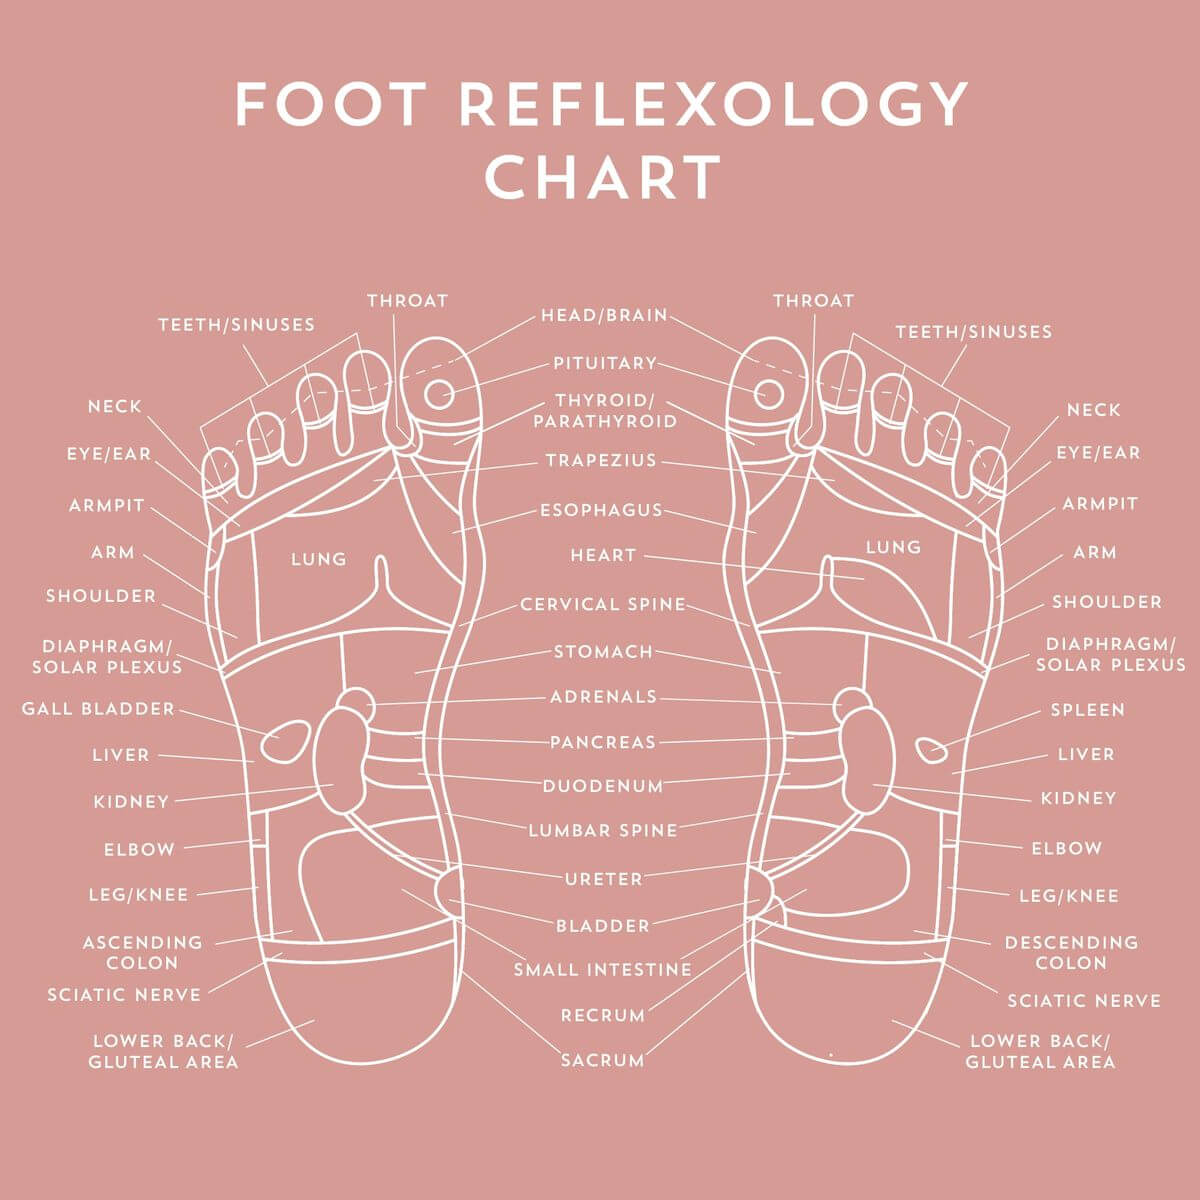
Image Source: Pinterest
Reading the Reflexology Foot Chart Zone by Zone
The Toes: Head, Brain, Sinuses, and Neck
The big toe is the primary zone for the head and brain. The top of the big toe corresponds to the top of the head. The sides of the big toe correspond to the sides of the head and temples. The smaller toes map to the sinuses, eyes, and ears, with each toe covering a different area of the face and upper head.
The base of all five toes, where they meet the ball of the foot, is the neck zone. This is why reflexologists working on headaches or tension spend time at the base of the toes, since the neck is almost always involved, whether or not it is where the pain is felt.
The Ball of the Foot: Chest, Lungs, and Heart
The ball of the foot, the padded area just below the toes, maps to the chest zone. The lung reflexes sit across most of this area, with the heart reflex sitting on the left foot only, in the inner portion of the ball near the big toe. The shoulder reflex sits on the outer edge of the ball, which is why people with shoulder tension often find this area reactive when a reflexologist works it.
The thyroid and throat reflexes sit at the inner base of the big toe, just where the ball of the foot begins. This small area is one of the most commonly reactive zones in the whole chart, which says something about how many people are walking around holding tension in their throat without realising it.
The Arch: Digestive Organs, Kidneys, and Adrenal Glands
The arch of the foot is where the digestive organs live on the chart, spread across a broader area than most people expect. The stomach sits in the upper arch on the left foot. The liver and gallbladder sit in the upper arch on the right foot. The small intestine occupies the lower arch on both feet, and the large intestine maps across the lower arch and into the heel zone in a layout that roughly follows the actual path of the colon through the body. The chart is consistent to a degree that starts to feel less like coincidence the more you look at it.
The adrenal gland reflex sits roughly in the centre of the arch, slightly above the midpoint of the foot. This is also where the solar plexus reflex is located, making the centre of the arch one of the most worked areas in any reflexology session focused on stress or anxiety. When a reflexologist presses here and the client reacts unexpectedly, that is usually what is happening. This is also one of the clearest examples of why experiencing the chart through a reflexology session at home teaches you more about it than reading one ever will.
The kidney reflexes sit just below the adrenal glands, slightly inward toward the spine zone. They are often reactive in people who are dehydrated, overtired, or carrying a lot of lower back tension, which are, with suspicious regularity, the same person.
The Inner Edge: The Spine
The inner edge of the foot, running from the base of the big toe down to the heel, maps to the spine. The big toe end relates to the cervical spine, the neck. Moving down the inner edge, it passes through the thoracic spine, the lumbar spine, and ends at the heel with the sacrum and coccyx.
A reflexologist pressing along the inner edge of the foot and finding tender spots is doing a map reading of the spine, which is a sentence that makes no sense until you are in the session and they name the exact vertebra level where you have been having problems. This is also one of the most consistently accurate parts of the chart: people with lower back pain almost always show a reactive zone in the lower inner edge of the foot, and people with neck tension almost always show reactivity at the base of the big toe.
The Outer Edge: Shoulder, Arm, and Hip
The outer edge of the foot maps to the outer structures of the body: the shoulder, arm, elbow, knee, and hip. These are the joints and limbs rather than the organs, and they run down the outer edge in the same top-to-bottom order as everything else. Shoulder at the top, hip at the bottom, knee and elbow roughly in the middle. The chart is almost insistently logical once you know the rule.
The Heel: Pelvis, Lower Back, and Reproductive Organs
The heel maps to the lowest part of the body: the pelvis, lower back, hips, and reproductive organs. It is a denser area of the chart with several important zones packed into a relatively small space. The sciatic nerve reflex runs across the base of the heel, which is relevant for anyone dealing with sciatica or lower back pain that runs down the leg.
This is also one of the areas where the chart’s logic becomes easiest to demonstrate. Someone with chronic lower back pain who has a reflexology session for the first time almost always finds the heel zone is the most reactive part of the whole session. The correlation between where the tenderness is on the foot and where the problem is in the body is hard to dismiss once you experience it.
How a Reflexologist Uses the Chart in Practice
The Chart Is a Starting Point, Not a Script
A trained reflexologist does not work through the chart mechanically, pressing each point for the same amount of time in the same order. They use the chart as a map and the response of the tissue as the navigation. Areas that feel different under the thumb, whether that is tender, gritty, or unusually reactive, get more attention. Areas that feel clear move through more quickly.
The chart tells the reflexologist where to look. The foot tells them what they find when they get there. A session that spends forty minutes on the digestive zone and barely touches the shoulder zone is not doing the chart wrong but responding to what the body is showing, using the chart as the framework for understanding what that means.
What Reactive Points Actually Feel Like
Reactive points on the reflexology chart are described differently by different practitioners, but the most common descriptions are a gritty or crystalline sensation under the thumb, a point that feels harder or more dense than the surrounding tissue, or a tenderness that the client notices as distinct from general foot sensitivity.
The working theory is that these reactive points reflect congestion or tension in the related body system, and that working them helps clear that congestion. Whether this is what is physically happening is still being researched, but the consistency with which reactive points on the chart align with areas the client already knows are problematic is one of the stronger arguments for the chart’s accuracy.
A session with a trained reflexologist who explains what they are finding as they work through it is the best way to experience the chart in action.
Reading about the chart is one thing. Having someone use it on your feet is another, and the gap between the two is usually what converts people. Book a reflexology session at home through Blys, available 7 days a week, 6 am to midnight across the UK.